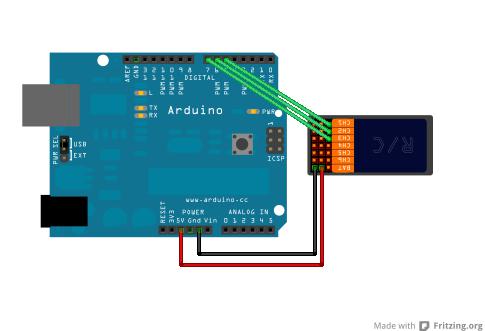
บทความนี้เป็น บทความที่ได้นำ remote rc มาต่อกับ arduino เพื่อควบคุมแบบไร้สาย
ดูจาก code จะเห็นได้ว่าง่ายครับ
อธิบาย code นะครับคุณจะใช้ กับตัวremote กี่ช่องก็ได้นะครับขึ้นอยู่กับเบอร์microนะครับ
ใช้ ขา 5 6 7 อ่านค่า PWM ที่ออกมาจากตัว recive นะครับคุณสามารถดูค่าได้ serial monitor ของ ardino นะครับ
เช่น เมื่อคุณโยกคันโยขึ้นลงของ CH1 ค่า Channel 1: ก็จะมีการเปลี่ยนแปลงนะครับ อยู่ในช่วงประมาณ 900- 2500 แล้วแต่ตัว remote ที่เราตั้งค่าตอน set remote นะครับ เพียงแค่นี้คุณก็สามารถใช้ remote rc ไปควบคุมอุปกรณ์ ตามที่คุณต้องการได้แล้วครับ
int ch1; // Here's where we'll keep our channel values
int ch2;
int ch3;

void setup() {

  pinMode(5, INPUT); // Set our input pins as such
  pinMode(6, INPUT);
  pinMode(7, INPUT);

  Serial.begin(9600); // Pour a bowl of Serial

}

void loop() {

  ch1 = pulseIn(5, HIGH, 25000); // Read the pulse width of
  ch2 = pulseIn(6, HIGH, 25000); // each channel
  ch3 = pulseIn(7, HIGH, 25000);

  Serial.print("Channel 1:"); // Print the value of
  Serial.println(ch1);        // each channel

  Serial.print("Channel 2:");
  Serial.println(ch2);

  Serial.print("Channel 3:");
  Serial.println(ch3);

  delay(100); // I put this here just to make the terminal
              // window happier
}


//==============================================================

ตัวอย่างแบบมีเงื่อนไข
int ch1; // Here's where we'll keep our channel values
int ch2;
int ch3;

void setup() {

pinMode(5, INPUT); // Set our input pins as such
pinMode(6, INPUT);
pinMode(7, INPUT);

Serial.begin(9600); // Pour a bowl of Serial

}

void loop() {

  ch1 = pulseIn(5, HIGH, 25000); // Read the pulse width of
  ch2 = pulseIn(6, HIGH, 25000); // each channel
  ch3 = pulseIn(7, HIGH, 25000);

  if(ch1>1000){Serial.println("Left Switch: Engaged");}
  if(ch1<1000){Serial.println("Left Switch: Disengaged");}
  /* I found that Ch1 was my left switch and that it
  floats around 900 in the off position and jumps to
  around 1100 in the on position */

Serial.print("Right Stick X:"); // Ch3 was x-axis
Serial.println(map(ch3, 1000,2000,-500,500)); // center at 0

Serial.print("Right Stick Y:"); // Ch2 was y-axis
Serial.println(map(ch2, 1000,2000,-500,500)); // center at 0

Serial.println(); //make some room

delay(100);// I put this here just to make the terminal
           // window happier
}


