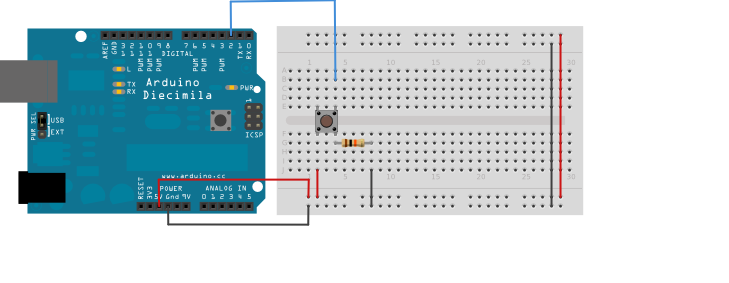
arduino ติดต่อ button
arduino ติดต่อปุมกดเราสามารถต่อได้หลายปุ่มสามรภใช้ได้ตั้งแต่ ขา D0-D13 ดังนั้นเราสามารเลือกที่จะใช้ได้
แต่ในตัวอย่างนี้จะเลือกที่จะใช้ขาที่ D2 เป็น input ดังนั้นเราจำเป็นที่จะต้องต่อ R 5-10K เพื่อให้ micro เห็น port เป็น active LOW
และเมื่อเรากดปุ่มไมโครก็จะเป็น active HIGHT ดูการเปลี่ยนแปลงที่ LED ที่บอร์ด
const int buttonPin = 2; // the number of the pushbutton pin
const int ledPin = 13; // the number of the LED pin
// variables will change:
int buttonState = 0; // variable for reading the pushbutton status
void setup() {
// initialize the LED pin as an output:
pinMode(ledPin, OUTPUT);
// initialize the pushbutton pin as an input:
pinMode(buttonPin, INPUT);
}
void loop(){
// read the state of the pushbutton value:
buttonState = digitalRead(buttonPin);
// check if the pushbutton is pressed.
// if it is, the buttonState is HIGH:
if (buttonState == HIGH) {
// turn LED on:
digitalWrite(ledPin, HIGH);
}
else {
// turn LED off:
digitalWrite(ledPin, LOW);
}
}
ดูการเปลี่ยนแปลงที่ LED ที่บอร์ด เมื่อกด LED ติดปล่อย LED ดับ


