arduino กับ RFID
RFID ย่อมาจากคำว่า Radio Frequency Identification เป็นระบบฉลากที่ได้ถูกพัฒนามาตั้งแต่ปี ค.ศ. 1980 โดยที่อุปกรณ์ RFID ที่มีการประดิษฐ์ขึ้นใช้งานเป็นครั้งแรกนั้น เป็นผลงานของ Leon Theremin ซึ่งสร้างให้กับรัฐบาลของประเทศรัสเซียในปี ค.ศ. 1945 ซึ่งอุปกรณ์ที่สร้างขึ้นมาในเวลานั้นทำหน้าที่เป็นเครื่องมือดักจับสัญญาณ ไม่ได้ทำหน้าที่เป็นตัวระบุเอกลักษณ์อย่างที่ใช้งานกันอยู่ในปัจจุบัน
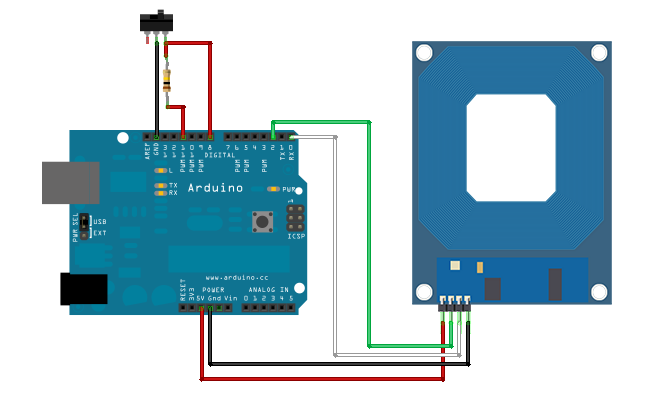
การต่อวงจรนะครับต่อตามรูป จะมีด้วยกัน4ขานะครับ แล้วแต่นะครับว่าคุณจะใช้รุ้นไหนแต่ในบทความนี้ output เป็น rs232 ดังนั้นคุณสามารถต่อกับ MCU ได้เลย
output ให้ดูทาง serial monitor คุณจะเห็นเลขรหัสขึ้นแสงเมื่อคุณทาบบัตร นะครับ
|
// RFID reader for Arduino
// Modified for Arudino by djmatic
int val = 0;
char code[10];
int bytesread = 0;
int buttonPin = 11;
int voltPin = 8;
int buttonState = 0;
void setup() {
Serial.begin(2400); // RFID reader SOUT pin connected to Serial RX pin at 2400bps
pinMode(2,OUTPUT); // Set digital pin 2 as OUTPUT to connect it to the RFID /ENABLE pin
digitalWrite(2, LOW); // Activate the RFID reader
pinMode(buttonPin, INPUT);
pinMode(voltPin, OUTPUT);
digitalWrite(voltPin, HIGH);
}
void loop() {
buttonState = digitalRead(buttonPin);
if(Serial.available() > 0) { // if data available from reader
if((val = Serial.read()) == 10) { // check for header
bytesread = 0;
while(bytesread if( Serial.available() > 0) {
val = Serial.read();
if((val == 10)||(val == 13)) { // if header or stop bytes before the 10 digit reading
break; // stop reading
}
code[bytesread] = val; // add the digit
bytesread++; // ready to read next digit
}
}
if(bytesread == 10) { // if 10 digit read is complete
if (buttonState == HIGH) {
Serial.print("readmode,");
}
else {
Serial.print("sendmode,");
}
Serial.println(code); // print the TAG code
}
bytesread = 0;
digitalWrite(2, HIGH); // deactivate the RFID reader for a moment so it will not flood
delay(3000); // wait for a bit
digitalWrite(2, LOW); // Activate the RFID reader
}
}
}
|


