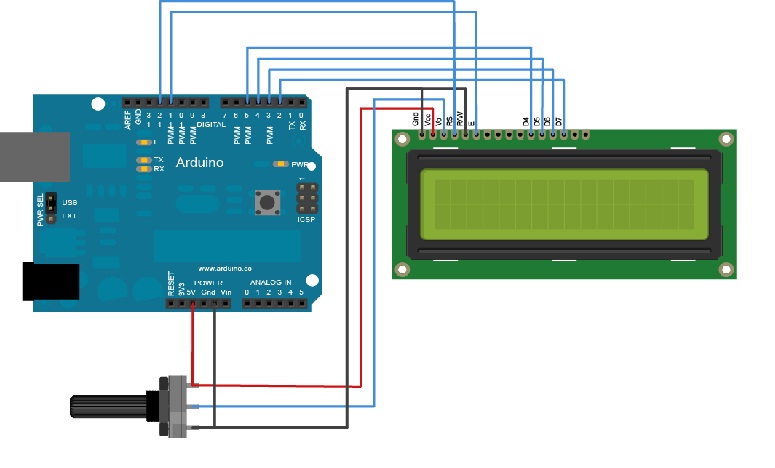
ardunio กับ LCD แสดงผล
การประกอบอุปกรณ์
-ภาคจ่ายไฟ
ให้ต่อไฟเลี้ยงและกราวด์ จากบอร์ดไปเข้า LCD ที่ขา 2 และ 1 ตามลำดับ และให้นำสายทั้ง 2 ไปต่อกับความต้านทานปรับค่าได้ที่ขาด้านนอกทั้ง 2 ด้าน จากนั้นให้นำขากลางของความต้านทานปรับค่าได้ ไปต่อกับขา 3 ของ LCD ซึ่งส่วนนี้จะเป็นการปรับค่า Contrast ของจอ LCD โดยใช้ความต้านทานปรับค่าได้ขนาด 10K หรือ 20K ก็ได้
-ภาคสัญญาณ
ให้ต่อสายไฟ 4 เส้น จาก LCD ขา 11, 12, 13 และ 14 ไปที่บอร์ดขาดิจิตอล 5, 4, 3 และ 2 ตามลำดับ
-ไฟ Backlight
ให้ต่อสายไฟ จาก LCD ขา 15, 16 ไปที่บอร์ดขา 13 และ Gnd ตามลำดับ ถ้าเราไม่ต้องการไฟ Backlight ก็ให้ข้ามขั้นตอนนี้ไป
- LCD RS pin to digital pin 12
- LCD Enable pin to digital pin 11
- LCD D4 pin to digital pin 5
- LCD D5 pin to digital pin 4
- LCD D6 pin to digital pin 3
- LCD D7 pin to digital pin 2
code มีแค่นี้เองครับเพียงเท่านี้คุณก็สามารถแสดงข้อความออกทาง LCD ได้แล้วครับ
/*
LiquidCrystal Library - Hello World
The circuit:
* LCD RS pin to digital pin 12
* LCD Enable pin to digital pin 11
* LCD D4 pin to digital pin 5
* LCD D5 pin to digital pin 4
* LCD D6 pin to digital pin 3
* LCD D7 pin to digital pin 2
* LCD R/W pin to ground
* 10K resistor:
* ends to +5V and ground
* wiper to LCD VO pin (pin 3)
This example code is in the public domain.
*/
// include the library code:
#include <LiquidCrystal.h>
// initialize the library with the numbers of the interface pins
LiquidCrystal lcd(12, 11, 5, 4, 3, 2);
void setup() {
// set up the LCD's number of columns and rows:
lcd.begin(16, 2);
// Print a message to the LCD.
lcd.print("hello, world!");
}
void loop() {
// set the cursor to column 0, line 1
// (note: line 1 is the second row, since counting begins with 0):
lcd.setCursor(0, 1);
// print the number of seconds since reset:
lcd.print(millis()/1000);
}
ส่วนด้านล่างนี้เป็น Function สำคัญๆ ที่ใช้ในการแสดงผลของ LCD สามารถเข้าไปทำความเข้าใจได้ครับ
Function
- LiquidCrystal()
- begin()
- clear()
- home()
- setCursor()
- write()
- print()
- cursor()
- noCursor()
- blink()
- noBlink()
- display()
- noDisplay()
- scrollDisplayLeft()
- scrollDisplayRight()
- autoscroll()
- noAutoscroll()
- leftToRight()
- rightToLeft()
- createChar()
เมื่อเราทำกร Upload เสร็จก็สามารถแสดงผลบนหน้าจอ ข้อความออก LCD และสามารถนำไปประยุกต์แสดงค่าของอย่างอื่นเช่น เวลา วันที่อุภูมิ ครับ
**** หมายเหตุ การต่อ LCDแบบ 16x4 , 20x4 ก็ต่อเหมือนกับแบบ 16x2 ครับ ต่างกันตรงใช้คำสั่งแสดงผมครับ
lcd.setCursor(0, 2); <<< แสดงออกบันทัดที่ 3
// print the number of seconds since reset:
lcd.print(" line 3 ");
ขอบคุณครับ ขอให้สนุกกับการเขียน micro


