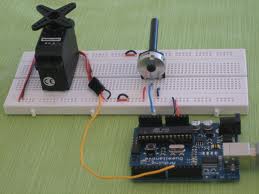
arduino ขับ RC Servo
การเขียนโปรแกรม arduino ขับ Rc servo โดยต่อขาของ servo มี 3 ขาคือ GND Vcc Signal
Servo บางรุ่นสามรถจ่ายไฟเลี่ยงได้ตั้งแต่ 5V-9V โดย ดูคู่มือแล้วแต่ละรุ่นเมื่อต่อไฟเลี้ยงให้กับ
Servo แล้วให้ต่อขา Signal ของ Servo เข้าที่ของ CPU ตามวงจรด้านล่าง
และต่อขาของ VR ที่ Analog 0 โดยสามถเลือกใช้ ค่าของ VR ประมาณ 1k-100k
เมื่อโหลดโปรแกรมลง CPU เสร็จ ลองทดสอบโดยหมุน VR ตัว Servo ก็จะหมุนตามมือเรา
แค่นี้เรากก็สามารถขับ Servo แบบง่ายๆ ได้แล้ว
*** Arduino ไม่ว่าจะใช้บอร์ดรุ่นไหนแต่ถ้าเป็นบอร์ดที่มี CPU เบอร์เดี่ยวกัน
เราก็สามารถใช้ Code ของ arduino ในการload และใช้งานได้เกือบทั้งหมด
แต่บางตัวอาจจะต้องมีการปรับแต่งนิดหน่อยครับ
//Code


#include <Servo.h>

SoftwareServo myservo;  // create servo object to control a servo

int potpin = 0;  // analog pin used to connect the potentiometer
int val;    // variable to read the value from the analog pin

void setup()
{
  myservo.attach(2);  // attaches the servo on pin 2 to the servo object
}

void loop()
{
  val = analogRead(potpin);            // reads the value of the potentiometer (value between 0 and 1023)
  val = map(val, 0, 1023, 0, 179);     // scale it to use it with the servo (value between 0 and 180)
  myservo.write(val);                  // sets the servo position according to the scaled value
  delay(15);                           // waits for the servo to get there

  SoftwareServo::refresh();
}


ความคิดเห็น