arduino ส่งข้อมูลผ่าน RS485 to arduino
RS-485 หรือ RS485 คือ มาตรฐานการการรับส่งข้อมูล ที่กำหนดขึ้นมาโดย สมาคม TIA / EIA เป็นการสื่อสารแบบ Serial สำหรับคอมพิวเตอร์และอุปกรณ์ต่างๆ โดยเป็นการรับส่งแบบ Half-Duplex โดยในระบบกำหนดให้มี Master 1 ตัวเพื่อคอยจัดคิวการสื่อสารใน Networkและ ให้อุปกรณ์ที่เหลือเป็น Slave โดย Slave แต่ละตัวจะมี Address ของตัวเอง เวลาที่ Master ต้องการจะสื่อสารกับ Slave ทำได้โดย ส่งโปรโตคอลออกไป โดยใน โปรดตคอล จะ ระบุ Address ของ Slave ที่ต้องการจะสื่อสารออกไป Slave ทุกตัวที่ต่ออยู่ใน Network จะรับข้อมูลแล้วเช็คดูว่า Address นั้นใน Address ของตัวเองหรือไม่ ถ้าเป็น Address ของตัวเองก็จะทำการตอบข้อมูลกลับ หรือ ทำงานตาม โปรโตคอลที่กำหนด ซึ่งการสื่อสารวิธีนี้ นิยมใช้กันใน งานอุตสาหกรรม ใช้สื่อสารระหว่าง คอมพิวเตอร์ กับเครื่องจักร หรือ อุปกรณ์ เครื่องมือวัดต่างๆ, PLCหรือ ถ้าในงานอาคาร ที่พบเห็นได้ เช่น ระบบ Access control
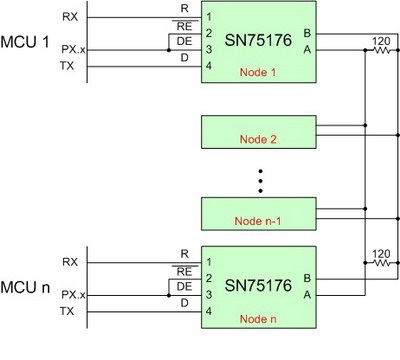
ในบทความนี้จะบอกถึงการใช้งานการส่งข้อมูลจาก arduino ผ่าน Rs485 ไปยัง arduion ซึ่งเราจะต่อวงจรเองหรือจะใช้ module ซำเร็จรูปมาต่อก็ได้
ซึ่งในวงจรคุณสามารถเลือใช้ IC SN75176 หรือ MAX485 ในการต่อวงจรได้
RS485 นั้นคุณสามารถมี Master และ slave ได้หลายตัวแต่ในบทความนี้ขอนำเสนอที่ 1 ต่อ 1นะครับ

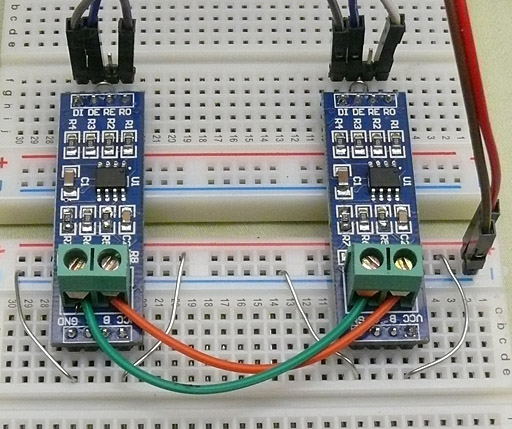
หรือถ้าใช้ module ก็สามารถเลือกใช้ได้หลายรุ่นนะครับเช่น

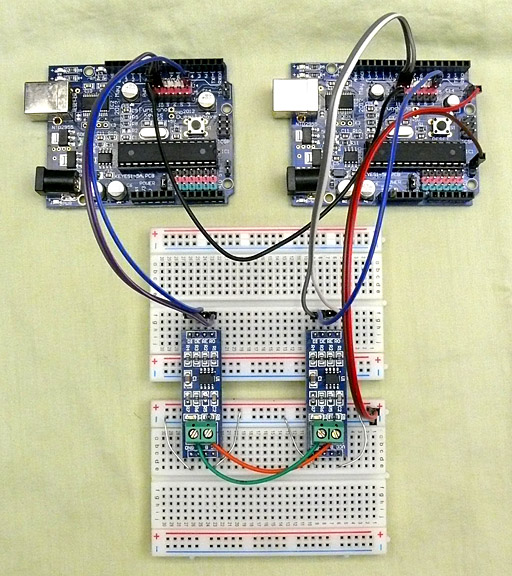
การต่อขาของตัวโมดูลนะครับ ซึ่งจะมี4ขา
- DI (data in) to pin 11 ต่อขา 11
- RO (receive out) to pin 10 ต่อขา 10
- DE (data enable) and RE (receive enable) jumpered together and to pin 3 ต่อขาD3 ไว้สำหรับจะให้ตัว 75176 เป็นตัวรับหรือตัวส่ง
- Vcc and Gnd connected อย่าลืมต่อขาไฟเลี้ยงด้วยนะครับ
- A and B : the RS485 pair
- Gnd between distant Arduinos can be in cable or local electrical ground
code ของตัว master ต่อ LED ที่ขา 13 ด้วยนะครับ เพื่อดู output
แยะยังสามารถดู OUTPUT ทาง serial monitor ด้วยนะครับ
Master Arduino Sketch:
/* YourDuino SoftwareSerialExample1
   - Connect to another Arduino running "YD_SoftwareSerialExampleRS485_1Remote"
   - Connect this unit Pins 10, 11, Gnd
   - Pin 3 used for RS485 direction control
   - To other unit Pins 11,10, Gnd  (Cross over)
   - Open Serial Monitor, type in top window.
   - Should see same characters echoed back from remote Arduino

*/

/*-----( Import needed libraries )-----*/
#include <SoftwareSerial.h>
/*-----( Declare Constants and Pin Numbers )-----*/
#define SSerialRX        10  //Serial Receive pin
#define SSerialTX        11  //Serial Transmit pin

#define SSerialTxControl 3   //RS485 Direction control

#define RS485Transmit    HIGH
#define RS485Receive     LOW

#define Pin13LED         13

/*-----( Declare objects )-----*/
SoftwareSerial RS485Serial(SSerialRX, SSerialTX); // RX, TX

/*-----( Declare Variables )-----*/
int byteReceived;
int byteSend;

void setup()   /****** SETUP: RUNS ONCE ******/
{
  // Start the built-in serial port, probably to Serial Monitor
  Serial.begin(9600);
  Serial.println("YourDuino.com SoftwareSerial remote loop example");
  Serial.println("Use Serial Monitor, type in upper window, ENTER");

  pinMode(Pin13LED, OUTPUT);
  pinMode(SSerialTxControl, OUTPUT);

  digitalWrite(SSerialTxControl, RS485Receive);  // Init Transceiver

  // Start the software serial port, to another device
  RS485Serial.begin(4800);   // set the data rate

}//--(end setup )---


void loop()   /****** LOOP: RUNS CONSTANTLY ******/
{
  digitalWrite(Pin13LED, HIGH);  // Show activity
  if (Serial.available())
  {
    byteReceived = Serial.read();

    digitalWrite(SSerialTxControl, RS485Transmit);  // Enable RS485 Transmit
    RS485Serial.write(byteReceived);          // Send byte to Remote Arduino

    digitalWrite(Pin13LED, LOW);  // Show activity
    delay(10);
    digitalWrite(SSerialTxControl, RS485Receive);  // Disable RS485 Transmit
  }

  if (RS485Serial.available())  //Look for data from other Arduino
   {
    digitalWrite(Pin13LED, HIGH);  // Show activity
    byteReceived = RS485Serial.read();    // Read received byte
    Serial.write(byteReceived);        // Show on Serial Monitor
    delay(10);
    digitalWrite(Pin13LED, LOW);  // Show activity
   }

}//--(end main loop )---

/*-----( Declare User-written Functions )-----*/

//NONE
//*********( THE END )***********
ส่วนของตัวรับ
Remote Arduino Sketch:
/* YourDuino SoftwareSerialExample1Remote
   - Used with YD_SoftwareSerialExampleRS485_1 on another Arduino
   - Remote: Receive data, loop it back...
   - Connect this unit Pins 10, 11, Gnd
   - To other unit Pins 11,10, Gnd  (Cross over)
   - Pin 3 used for RS485 direction control
   - Pin 13 LED blinks when data is received


*/

/*-----( Import needed libraries )-----*/
#include <SoftwareSerial.h>
/*-----( Declare Constants and Pin Numbers )-----*/
#define SSerialRX        10  //Serial Receive pin
#define SSerialTX        11  //Serial Transmit pin

#define SSerialTxControl 3   //RS485 Direction control
#define RS485Transmit    HIGH
#define RS485Receive     LOW

#define Pin13LED         13

/*-----( Declare objects )-----*/
SoftwareSerial RS485Serial(SSerialRX, SSerialTX); // RX, TX

/*-----( Declare Variables )-----*/
int byteReceived;
int byteSend;

void setup()   /****** SETUP: RUNS ONCE ******/
{
  // Start the built-in serial port, probably to Serial Monitor
  Serial.begin(9600);
  Serial.println("SerialRemote");  // Can be ignored

  pinMode(Pin13LED, OUTPUT);
  pinMode(SSerialTxControl, OUTPUT);

  digitalWrite(SSerialTxControl, RS485Receive);  // Init Transceiver

  // Start the software serial port, to another device
  RS485Serial.begin(4800);   // set the data rate
}//--(end setup )---


void loop()   /****** LOOP: RUNS CONSTANTLY ******/
{
  //Copy input data to output
  if (RS485Serial.available())
  {
    byteSend = RS485Serial.read();   // Read the byte

    digitalWrite(Pin13LED, HIGH);  // Show activity
    delay(10);
    digitalWrite(Pin13LED, LOW);

    digitalWrite(SSerialTxControl, RS485Transmit);  // Enable RS485 Transmit
    RS485Serial.write(byteSend); // Send the byte back
    delay(10);
    digitalWrite(SSerialTxControl, RS485Receive);  // Disable RS485 Transmit
//    delay(100);
  }// End If RS485SerialAvailable

}//--(end main loop )---

/*-----( Declare User-written Functions )-----*/
//NONE

//*********( THE END )***********


