Arduino and Load cell
ลิงค์การต่อบอร์ดขยาย load cell ที่ใช้งานง่ายสำเร็จรูป
http://www.circuitshops.com/articles/42157722/arduino%20%E0%B8%95%E0%B8%B4%E0%B8%94%E0%B8%95%E0%B9%88%E0%B8%AD%20load%20cell%202%20%E0%B9%81%E0%B8%AA%E0%B8%99%E0%B8%87%E0%B9%88%E0%B8%B2%E0%B8%A2.html
โหลดเซลล์ (Load cell )
โหลดเซลล์แบบสเตรนเกจ (Strain Gauge Load cell) หลักการของโหลดเซลล์ ประเภทนี้ก็คือ เมื่อมีน้ำหนักมากระทำ ความเครียด(Strain) จะเปลี่ยนเป็นความต้านทานทางไฟฟ้าในสัดส่วนโดยตรงกับแรงที่มากระทำ ปกติแล้วมักจะใช้เกจวัดความเครียด 4 ตัว
 (วงจร Wheatstone Bridge Circuit) ในการวัดโดยเกจตัวต้านทานทั้งสี่จะเชื่อมต่อเข้าด้วยกันเพื่อใช้แปลงแรงที่กระทำกับตัวของมันไม่ว่าจะเป็นแรงกดหรือแรงดึงส่ง สัญญาณออกมาเป็นแรงดันไฟฟ้า
เราได้รู้กันมาแล้วว่า Load cell คืออุปกรณ์ที่ใช้วัดค่าแรง หรือน้ำหนักที่กระทำกับ Load cell โดยที่ Load cell จะเปลี่ยนแรงหรือน้ำหนักให้เป็นสัญญาณทางไฟฟ้า (mV/V) ซึ่งจะมีทั้งแบบ 1, 2, 3 mV/V แต่ในบ้านเราที่มีใช้กันอยู่ส่วนใหญ่จะเป็นแบบ 2mV/V หรือ 3mV/V
1. การเสียหายของ Load cell
คือการที่ Load cell ไม่สามารถวัดค่าได้ หรือวัดค่าไม่ได้ไม่ตรงโดยสัญญาณเอาท์พุทที่ส่งออกมาสูงเกินไป Overload หรือสัญญาณเอาท์พุทที่จ่ายออกมาไม่นิ่ง
2. อาการผิดปกติของ Load cell
2.1 Overload
การที่สัญญาณเอาท์พุทที่จ่ายออกจาก Load cell มีค่ามากเกินกว่า Rang output ของ Load cell ที่มีเอาท์พุท 2mV/V ใช้ Excitation 10VDC จะต้องมีเอาท์พุทไม่เกิน 20 mV ซึ่งอาการนี้จะทำให้ Controller ที่รับสัญญาณ จาก Load cell ไม่สามารถอ่านค่าได้ หรือ หน้าจอแสดง OL
2.2 Drifting output
สัญญาณเอาท์พุทที่ส่งออกมาจาก Load cell ไม่นิ่งในขณะที่มีน้ำหนัก หรือไม่มีน้ำหนักกดอยู่ก็ตาม(ไม่มีแรงสั่นสะเทือน) ซึ่งอาการนี้จะทำให้ Controller อ่านค่าไม่ตรงตัวเลขวิ่งไปวิ่งมา
2.3 Non-repeatability problem
คือ หลังจากที่เอาน้ำหนักออกแล้วน้ำหนักที่หน้าจอ Controller ไม่กลับไปที่ศูนย์สัญญาณไม่กลับไปที่เดิม ซึ่งอาการนี้จะทำให้ค่าน้ำหนักที่ชั่งหรือแรงที่กดในแต่ละครั้งไม่มีความแม่นยำ
2.4 Negative voltage output
คือ การที่สัญญาณเอาท์พุทที่จ่ายออกมาจาก Load cell มีค่าเป็นลบ ซึ่งอาการนี้จะทำให้ Controller อ่านค่าน้ำหนักเป็นลบ หรือ Controller บางยี่ห้อที่รับสัญญาณอินพุทเป็นบวกเท่านั้นจะไม่สามารถอ่านค่าน้ำหนักได้หรือหน้าจออาจจะแสดง Error
“วิธีการป้องกันไม่ให้ Load Cell เสียหาย”
2.5 No output
คือ การที่ไม่มีสัญญาณเอาท์พุทออกมาจากตัว Load cell ซึ่งอาการนี้จะทำให้ Controller ไม่สามารถอ่านค่าน้ำหนักได้
3. สาเหตุที่ทำให้ Load Cell เสีย
3.1 Over Weighing (Overload)
- การใช้น้ำหนัก หรือแรงกด เกินพิกัดของ Load cell
- การที่มีแรงกระแทกลงบน Load cell เกินพิกัดของ Load cell
3.2 Humidity, Noise (Drifting output)
การที่มีความชื้นในสาย Load cell หรือ Summing box การที่มีสัญญาณรบกวนเข้ามาในสาย Load cell เกิดจากการเดินสาย Load cell ใกล้สาย Power
3.3 Mechanical error (Non-repeatability problem)
การติดตั้ง Load cell ไม่สมดุล การที่มีโครงสร้างค้ำยัน หรือท่อที่มาต่อกับถัง แข็งเกินไปไม่สามารถให้ตัวได้
3.4 Mistake installation or mistake wiring (Negative voltage output)
-การติดตั้ง Load cell ในทิศทางกลับกัน
-การต่อสายสัญญาณสลับกัน
3.5 Electric welding and Lightning (No output)
การเชื่อมโครงสร้างด้วยการเชื่อมไฟฟ้าโดยที่มี Load cell ติดตั้งอยู่ การเกิดฟ้าผ่า
4. การป้องกัน Load cell ไม่ให้เสียหาย
4.1 Design
ออกแบบและเลือกขนาดพิกัดของ Load cell ให้ถูกต้อง และเหมาะสม ถ้าเลือกพิกัดน้อยเกินไป โอกาสที่น้ำหนักจะเกินและสร้างความเสียหายแก่ Load cell มีสูง แต่ถ้าเลือกพิกัดมากเกินไป ก็จะทำให้ความละเอียดน้อยลง ค่าน้ำหนักมีโอกาสผิดพลาดมากขึ้น ดังนั้นในการออกแบบ ติดตั้ง Load cell จึงควรปรึกษาผู้ขายที่มีความรู้เกี่ยวกับ Load cell เพื่อที่จะได้เลือกใช้งาน Load cell ได้อย่างถูกต้องและเหมาะสม
4.2 Electrical installation
การติดตั้งอุปกรณ์ Summing box ควรติดตั้งในที่ๆ ไม่มีฝนสาดหรือเลือกอุปกรณ์ที่มีการ Seal อย่างดี สามารถกันน้ำได้ดี ควรหลีกเลี่ยงการเดินสายสัญญาณ Load cell ใกล้กับสาย Power เพื่อป้องกันสัญญาณรบกวนที่มาจากสาย Power
4.3 Mechanical installation
การติดตั้ง Load cell จะต้องสมดุลกันทุกจุด กรณีที่มีการต่อท่อเข้ากับตัวถังจะต้องเป็นท่ออ่อนที่สามารถให้ตัวได้เพื่อให้ถังเป็นอิสระ ไม่มีอะไรมาค้ำยัน
4.4 Load cell installation and wiring
การติดตั้ง Load cell ควรติดตั้งให้ถูกทิศทางซึ่งจะลูกศรบอกทิศทางที่ตัว Load cell หรือคู่มือ การต่อสาย Load cell เข้ากับ Controller จะต้องต่อให้ถูกขั้วตาม code สี ของแต่ละยี่ห้อ
4.5 Shield and Lightning arrester
ควรติดตั้งสาย Shield ระหว่าง Mounting บนและล่างของ Load cell เพื่อเป็นการ Bypass กระแสไฟฟ้าที่เกิดจากการเชื่อมเพื่อป้องกัน Load cell ไม่ไห้เกิดความเสียหาย
จากที่ได้กล่าวมานี้คงจะทำให้ทุกท่าน ได้ทราบถึงสาเหตุการเสียของ Load cell ว่าเกิดขึ้นจากสาเหตุใดได้บ้าง และทราบถึงวิธีการป้องกันว่าจะต้องทำอย่างไร เพื่อให้เราสามารถใช้งาน Load cell ได้ยาวนานที่สุดและไม่มีปัญหานะครับ
พบกันคราวหน้าจะกล่าวถึงการตรวจสอบ Load cell เบื้องต้นและการนำ Load cell ไปใช้งานร่วมกับมิเตอร์ยอดอัจฉริยะของ Red Lion Controls “PAXS”
แต่ถ้าท่านต้องการรายละเอียดรวมถึงการให้คำปรึกษาเกี่ยวกับ Load cell และปัญหาต่างๆที่เกิดขึ้น ท่านสามารถติดต่อมาได้ที่แผนก Process Instrument บริษัท คอมโพแม็ก จำกัด ซึ่งเรามีทีมงานที่มีประสบการณ์คอยให้คำปรึกษาหรือนัดพบท่านเพื่อเข้าไปดูหน้างาน หรือนำอุปกรณ์ไปทดสอบเบื้องต้น
คุณเคยรู้หรือไม่ ว่าทำไม Load Cell จึงเสีย
เราได้รู้จักกันแล้วว่า Load Cell คืออะไร มีหลักการทำงานอย่างไรและมีชนิดอะไรบ้าง ในบทความฉบับนี้ผมจะกล่าวถึง
1. การเสียหายของ Load cell
2. อาการผิดปกติของ Load cell
3. สาเหตุที่ทำให้ Load cell
4. การป้องกันไม่ให้ Load cell เสียหาย
…
…
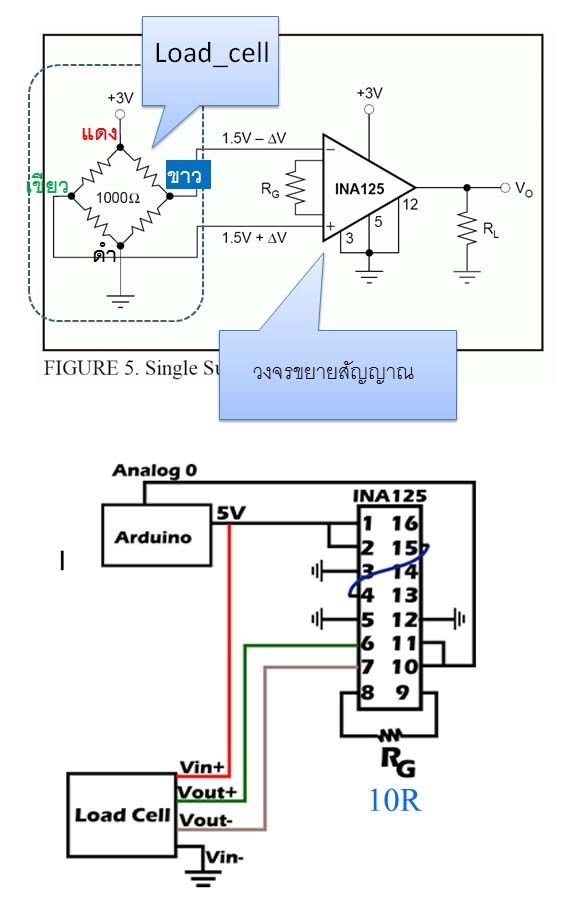
This is the schematics for hooking it up:
The resistor sets the gain. Look in the datasheet of the ina125p for details.
The connection is as suggested for single supply operation in the datasheet:
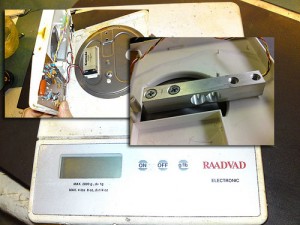
And this is how it looked at the breadboard:
…And on a shield
Simple arduino example
This is a simplified example of how to convert your load cell analog readings to kilo/load.
Basic trick: Just use map();
// Arduino as load cell amplifier


// Load cells are linear. So once you have established two data pairs, you can interpolate the rest.

// Step 1: Upload this sketch to your arduino board

// You need two loads of well know weight. In this example A = 10 kg. B = 30 kg
// Put on load A
// read the analog value showing (this is analogvalA)
// put on load B
// read the analog value B

// Enter you own analog values here
float loadA = 10; // kg
int analogvalA = 200; // analog reading taken with load A on the load cell

float loadB = 30; // kg
int analogvalB = 600; // analog reading taken with load B on the load cell

// Upload the sketch again, and confirm, that the kilo-reading from the serial output now is correct, using your known loads

float analogValueAverage = 0;

// How often do we do readings?
long time = 0; //
int timeBetweenReadings = 200; // We want a reading every 200 ms;

void setup() {
  Serial.begin(9600);
}

void loop() {
  int analogValue = analogRead(0);

  // running average - We smooth the readings a little bit
  analogValueAverage = 0.99*analogValueAverage + 0.01*analogValue;

  // Is it time to print?
  if(millis() > time + timeBetweenReadings){
    float load = analogToLoad(analogValueAverage);

    Serial.print("analogValue: ");Serial.println(analogValueAverage);
    Serial.print("             load: ");Serial.println(load,5);
    time = millis();
  }
}

float analogToLoad(float analogval){

  // using a custom map-function, because the standard arduino map function only uses int
  float load = mapfloat(analogval, analogvalA, analogvalB, loadA, loadB);
  return load;
}

float mapfloat(float x, float in_min, float in_max, float out_min, float out_max)
{
  return (x - in_min) * (out_max - out_min) / (in_max - in_min) + out_min;
} 


